
How to Start an Agentforce Session (Agentforce Action Prompts) in Microsoft Teams
Centro allows you to proactively start an Agentforce session in Microsoft Teams directly from Salesforce Flow.
This makes it possible to prompt users when action is required—such as data hygiene updates, missing required fields, overdue close dates, or follow-up tasks—without requiring the user to manually open Salesforce or initiate an AI conversation.
This article walks through how to configure the Start a Session with an Agentforce Agent flow element.
Overview
The Start Agentforce Session flow action allows Salesforce admins to trigger a Microsoft Teams conversation with an Agentforce agent when a record meets defined criteria.
Common use cases include:
Opportunity close date is in the past
Required fields are missing
Deal stage requires additional validation
Service case escalation follow-up
Rep action reminders
Knowledge prompts for employees
This creates a proactive workflow where the agent prompts the user inside Microsoft Teams.
Example Use Case
In this example, when an Opportunity close date is past due:
A record-triggered flow runs
Centro starts a Teams session
The sales rep receives a proactive message
The Agentforce Sales Agent asks them to update the close date
This helps improve pipeline hygiene and forecast accuracy.
Step 1: Create a Record-Triggered Flow
In Salesforce:
Setup → Flows → New Flow
Select:
Record-Triggered Flow
Object: Opportunity
Example criteria:
CloseDate < TODAY()
IsClosed = False
This ensures the flow only runs when an open opportunity has an outdated close date.
Step 2: Add the Centro Flow Action
Inside the flow, add the Centro action:
Start a Session with an Agentforce Agent
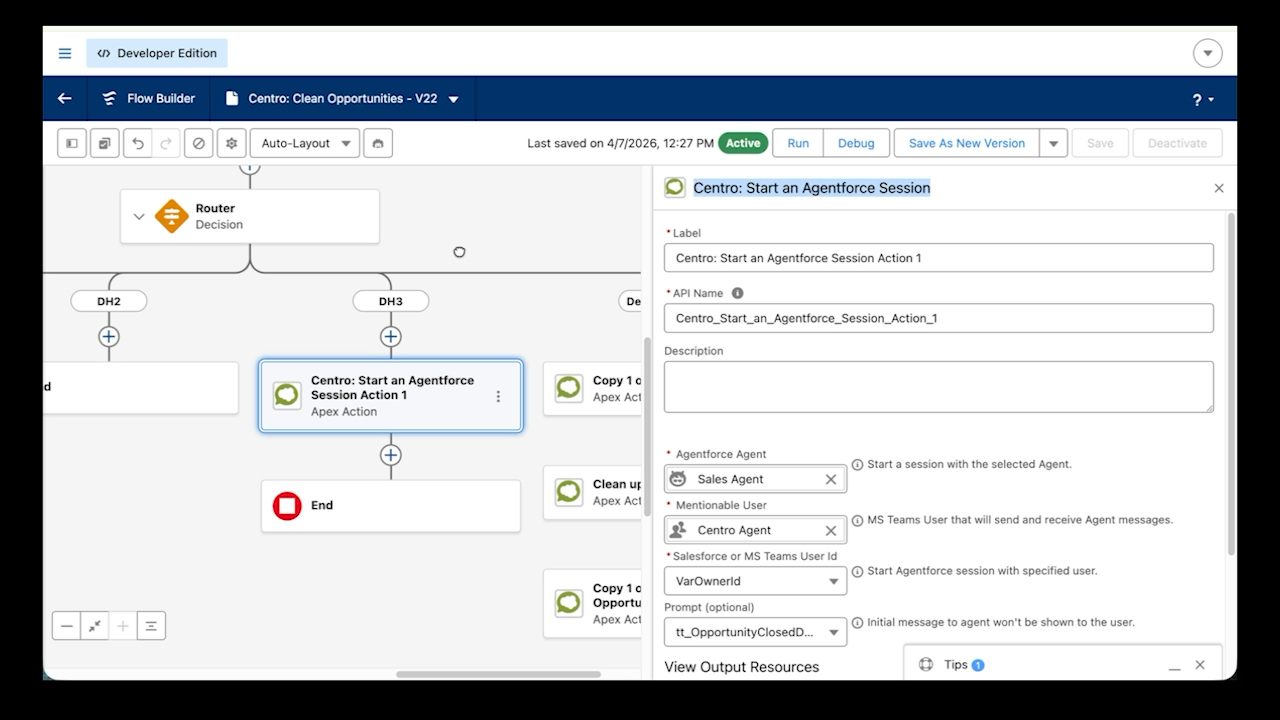
This is the core flow element that starts the Teams conversation.
Step 3: Select the Agentforce Agent
Choose the active Agentforce agent you want to use.
Example:
Salesforce Sales Agent
This agent’s capabilities will be available directly in Microsoft Teams.
Because this is an employee agent, it runs in the context of the authenticated Salesforce user.
This means it can:
identify the rep
respect Salesforce permissions
access user-specific record data
Step 4: Configure the App Mentionable User
Select the app mentionable Teams user.
Example: Centro Agent
This is the Teams identity the user will interact with.
The rep will see the message as coming from this configured agent identity.
Step 5: Pass the Target User
Specify which Teams user should receive the session.
Most commonly this is the record owner.
Example variable:
Opportunity.OwnerId
This is typically mapped through a text variable that resolves to the corresponding Teams user ID.
Example flow variable:
OwnerTeamsUserId
This ensures the session is sent directly to the correct sales rep.
Step 6: Configure the Prompt
The prompt field is optional, but highly recommended.
This is where the workflow becomes dynamic.
Example prompt template:
The following opportunity record has a close date in the past.Please prompt the owner to update the close date.
Opportunity ID: {!$Record.Id}
Opportunity Name: {!$Record.Name}
Current Close Date: {!$Record.CloseDate}
This allows the agent to start the conversation with contextual record information.
Example user experience in Teams:
Your opportunity “Express Logistics Portable Truck Generators” has a close date in the past. Please update it to a new value.
Step 7: Use Output Variables (Optional)
The action can return conversation output variables such as:
Conversation ID
Session ID
Post reference ID
These can be used for downstream automation.
Examples:
post a Centro record block
add follow-up buttons
log interaction history
continue the thread later
Need Help?
If you need assistance configuring:
Teams user mapping
mentionable users
flow variables
dynamic prompts
output variables
please contact the Centro team: support@centro.rocks