Adding the Centro (LWC) Live Link to Your Experience Cloud Home Page
Adding the Centro Live Link to Your Experience Cloud Home Page
Introduction
This support article guides you through adding a Centro Live Link to your Experience Cloud home page. It allows you to set up both dynamic and static Slack links. Follow the steps below to integrate Slack with your Experience Cloud for improved communication and collaboration.
Steps to Add a Dynamic Slack Link
Navigate to the Component Section:
- Access the component section within your Experience Cloud home page.
- Go to the custom items section.
- Drag and drop the "Single Conversation" web component onto your home page.
Configure the Dynamic Channel:
 Initially, the component will be blank, and design time settings will also be empty.
- To set up a dynamic channel, follow these steps:
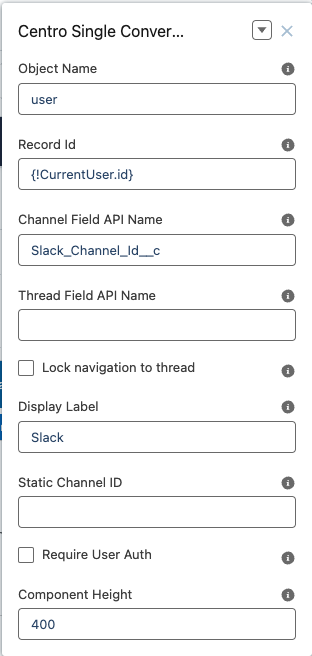
- Set the Object Name:
- Specify the object name, typically referencing the current user or account for the home page.
- Reference the Current User ID:
- Ensure the home page references the user's login record.
- For this, use the current user ID.
- Custom Field for Slack Channel ID:
- On the user record, create a custom field named "Slack Channel ID."
- This field should contain the ID of the Slack channel you wish to reference.
- Optional Settings:
- Thread Reference: Optionally, you can lock the component to a specific thread.
- Display Name: Customize the display name (e.g., "Slack," "Talk to Account Team," "Team Chat").
- Authorization: If necessary, enable authorization. Note that if the Experience Cloud user is already authorized to log in, you can leave this unchecked.
- Component Height: Adjust the height of the component as needed.
- Set the Object Name:
Finalize Dynamic Channel Setup:
- Once these settings are configured, the dynamic channel will display on your Experience Cloud home page.
Note: The Experience Cloud User must have at least read-only access to the Channel and Thread dynamic display fields.
Steps to Add a Static Slack Link
Configure a Static Channel:
- A static channel link will be shared across all community users.
- To set this up:
- Remove any dynamic settings previously configured.
- Paste the Slack channel ID directly from your connected Slack workspace into the appropriate field.
Finalize Static Channel Setup:
- After pasting the channel ID, the static channel will load and display on your Experience Cloud home page.
Conclusion
