
Sending and Receiving Salesforce Approvals in Slack
This article will describe how to set up sending Salesforce Approvals to Slack with actionable buttons using Salesforce Flows.
Need assistance setting up in your org and workspace? Send us a note: support@centro.rocks
Goal: Display a Slack message similar to this for the approver to see, using existing Salesforce Approval Processes and Salesforce Flows:

Prerequisites & Customizations:
- Centro installed in both the Slack Workspace and Salesforce Org.
- A working Salesforce Approval Process. We'll be using the example in the Salesforce Approval Trailhead.
- Salesforce Admin Access.
- Slack Workspace Admin Access.
The flow will perform the following:
- If an opportunity discount is set above 40%, trigger the Approval Process.
- Send an approval Slack notification to the appropriate Approver (DM or public channel).
- Approver pressed Approve button in Slack.
- The approver is taken to the appropriate Salesforce approval page. This handles proper commenting, authorizations, and more. If you'd like to use platform events for Slack buttons, see our other support article: Using Salesforce Flow, Slack Buttons, and Platform Events.
Steps:
- Create a record-triggered flow. We'll use the Opportunity object when the discount percentage field is above 40%. This mimics our Salesforce Approval process. See element configuration below:
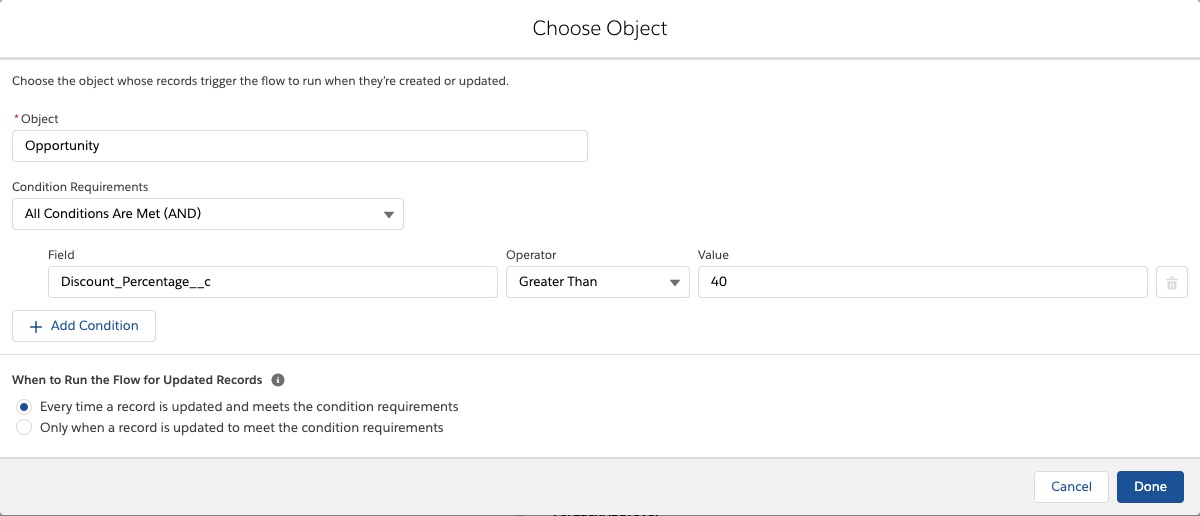 Note that you'll likely want to change the Flow Run option to "Only when a record is updated.." as it's set to "every time a record is updated" for testing purposes.
 - Create Resources Variables. Let's set up our variables for use during the flow:
 The UserIds Collection: This Text variable is used to collect multiple User Ids and Slack Ids that may exist with multiple approvers in an Approval Process:
 The WorkItemIds Collection: An approval process will have multiple Work Items that will be used in the URL in the button we're building for the Slack message:
 User from GetSlackUser: This will be set by a Get Records elements in the flow. No need to set this up at this time.
SlackUserId: Used to store in the loop the Slack User IdUserId: Used to store in the loop the Approval User Id VarDiscountPercentage: Used in the Slack Message to alert the Approver of how much the discount percent requested for approval is.
- Create "Submit for Approval" Action Element. This is an out of box element in Flow. This will override the existing initial step action in the Approval Process, but gain us the IDs we need for respecting the Process Steps later in the flow. Add it as a step after the Start element and configure as follows:


 Note the Input Values use the RecordId from the Opportunity, the API name of the Approval Process we're invoking, and Skipping the normal entry criteria. We do need to Manually Assign output variables. Note we're using the variables we created in Step 2.
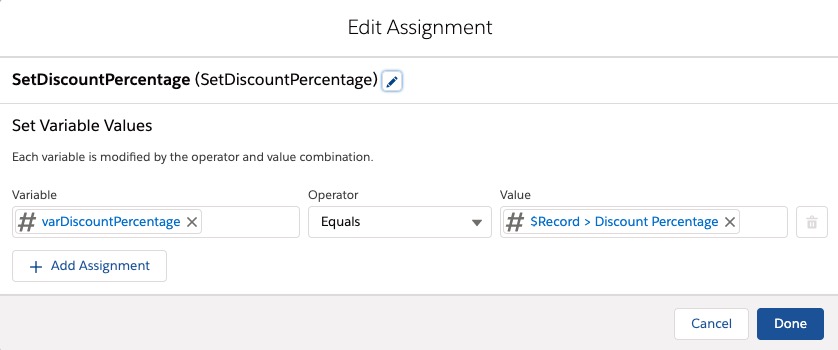
 - Set Discount Percentage. Next, let's set a variable for use in the Slack message text later in the Flow:

- Loop on Approvers. This element will be the header of a series of elements and actions that send approvals to all appropriate approvers and based on the Approval Work items. Set as follows:

 Make sure to note the API name of this loop element. We'll need it when creating the URL in the Slack button later.
 - Loop on Users. Now we'll need to loop through all Users on any approval step, getting their Slack IDs. Create this item after the For Each loop on Work Items. Set as follows:

 Note that we'll specify the direction for iteration as Last to First. This is because we'll go in reverse order, sending messages and removing off the "stack".
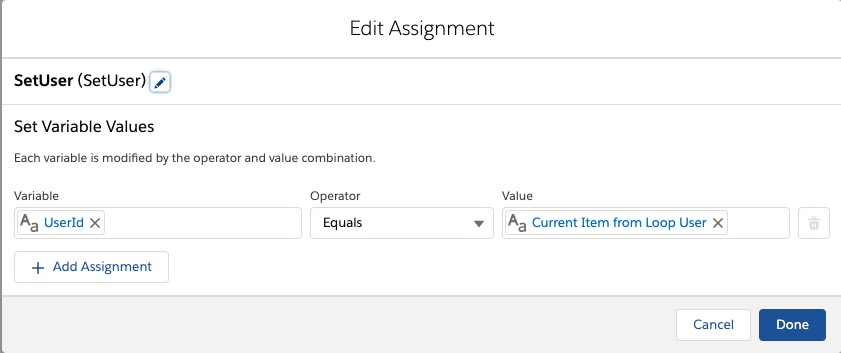
 - Set the User ID based on the current Loop User: We need to set this to grab the Slack ID in a moment:

- Get the Slack User based on the Current User: Now that we have the right User ID, we can fetch the field where we have set the Slack User ID, as follows:


- Set the Slack ID. Now set the variable we created earlier as follows:


- Create and Send the Slack Approval Message. This is where the bulk of the work happens. In this Centro Action Element, you'll create the text of the message, the buttons, and the URLs the buttons will go to. First add the element as follows:

 First, choose where the message will appear. In this test, we have it going to a public #general channel. However, you may want to send it to a user in a DM. If that's the case, click "Use Variable", and set to the Slack User Id we gathered previously. Here's an example of that:
 Next, craft the message you want to appear in Slack. In this example, we use the Slack Discount percentage, and the SlackUserId to create the @mention notification.
Choose if you want to have the record detail appear. This can be nice for the approver to see the detail of the Opportunity.
Finally, craft the buttons. Note in the Approve button, the URL is crafted to utilize the Workflow Process. The format of the URL is:
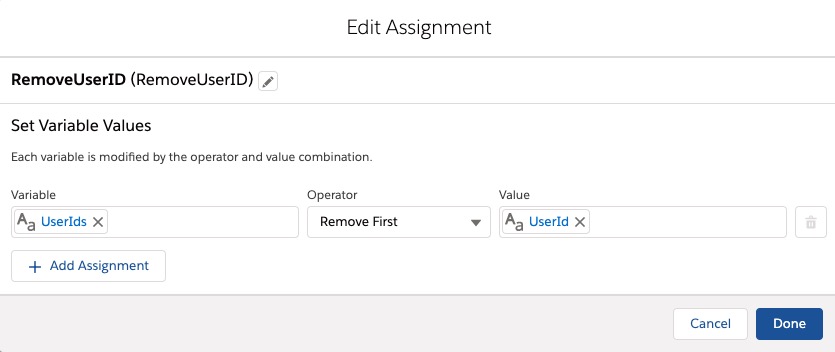
"https://<yourSalesforceURL>/p/process/ProcessInstanceWorkitemWizardStageManager?id=<API_Name_ForEachApprove_fromStep5>" - Remove the Loop's User ID: This is to loop through the rest of the Approvers and is configured as follows:

- You're done! The entire flow should look like the following:

All that's left is to test it. Save and Activate the flow and Approval Process. Trip a record, and you should see the following in Slack:

Clicking Approve will take you to the appropriate page in Salesforce:

Need assistance setting up in your org and workspace? Send us a note: support@centro.rocks